

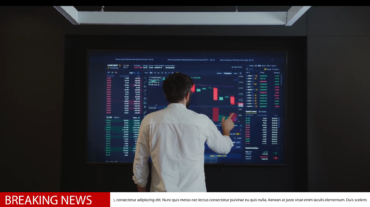
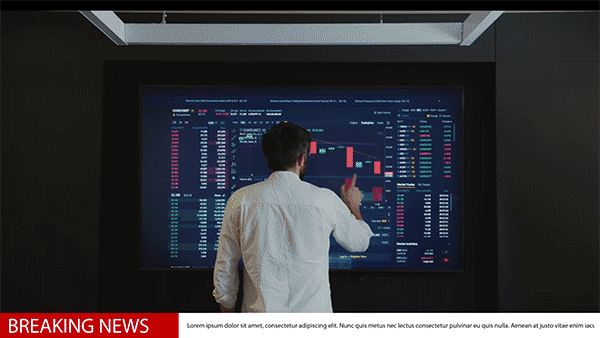
Lower thirds are a great way to add important information to the screen without taking attention away from the main part of the movie. They are often used to show names, titles, or more information in newscasts, documentaries, conversations, and YouTube videos. Adobe Premiere Pro, which is one of the most popular video editing programs, makes it easy to make and add lower thirds. In this blog post, we’ll show you step-by-step how to use Premiere Pro to add lower thirds to your movies.
Step 1: Import Footage and Create a New Sequence
Start Adobe Premiere Pro and add your video clips or pictures to the project to get started. Once your media is sorted, you can make a new sequence by dragging one of the clips to the “New Item” button in the project panel or by going to File > New > Sequence from the menu. Make sure that the resolution and frame rate of your footage meet the settings for your sequence.
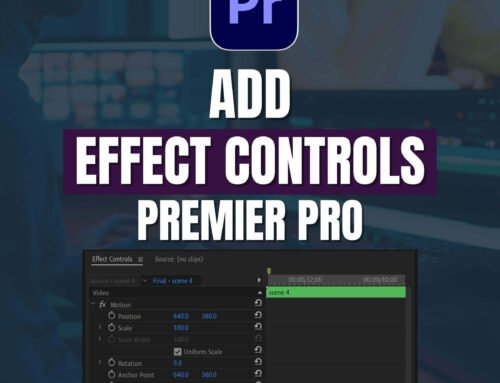
Step 2: Access the Essential Graphics Workspace
Go to the Essential Graphics workspace in Premiere Pro. To achieve this, open the project panel and select the “Graphics” option. Using this workspace makes it easier to design, personalize, and manage visuals like lower thirds.
Step 3: Create a New Text Layer
To add a new text layer, select the “New Layer” icon (the square with a plus sign) in the Essential Graphics panel. Your lower third will be built on top of this text layer.
Step 4: Customize the Lower Third
Edit the content to your specifications while the text layer is chosen. Lower thirds typically include names, titles, or succinct descriptions. Change the font, size, color, and other text styling options to fit the style of your video as a whole.
Step 5: Position the Lower Third on the Screen
To put the lower third where you want it to display on the video, drag the text layer in the Program Monitor. Alternatively, you can assure accuracy and fine-tune the positioning by using the Motion settings in the Effects Control panel.
Step 6: Add Animation (Optional)
You can animate the lower third’s entry or leave to give it more visual appeal. To create a fade-in or fade-out effect, use keyframes in the Effects Control panel to adjust attributes like opacity. Keep in mind that understated animations can improve the viewing experience without being unduly disruptive.
Step 7: Save the Lower Third as a Template (Optional)
Save the lower third design as a template if you want to use it for multiple projects. Save the template in a location that is convenient for you by selecting the “Export Motion Graphics Template” icon in the Essential Graphics panel.
Step 8: Apply the Lower Third to Your Sequence
Drag the lower third from the Essential Graphics panel to the timeline in your sequence once you’ve adjusted it as you like. Set the lower third’s duration on the timeline to correspond with the time it appears on the screen.
Step 9: Preview and Make Adjustments
See how the lower third fits with your video by seeing the sequence being played again in the Program Monitor. To get the desired outcome, you may need to make any extra tweaks to the placement, timing, or look.
Step 10: Export Your Video
Export the video once you are happy with how the lower third and the whole thing appear. To select your preferred export options and produce a high-quality video with the lower third, go to File > Export > Media.
Conclusion:
Using Adobe Premiere Pro to add lower thirds to your videos is a simple method that greatly improves the level of professionalism of your work. These educational visuals add important context while also making for a more polished and interesting viewing experience. As a result, the next time you edit a video, think about adding lower thirds using the instructions provided in this guide and watch your content stand out with a polished appearance. Glad editing!
Lower Third
View All


[…] never told them before, catching the attention of your audience. Check out our blog post “How to Add Lower Thirds in Premiere Pro” for a hands-on guide to making lower thirds that look like they were made by a […]
[…] a lower third in Premiere Pro. We’ll take care of you. Check out our detailed guide on “How to Add Lower Thirds in Premiere Pro” to take your video editing to the next […]
[…] How to Add Lower Thirds in Premiere Pro […]
[…] out this helpful guide on Snail Motion for more ideas on how to improve your videos with effects. It shows how to add interesting lower […]