
Hello, fellows! Welcome back to Snail Motion, your go-to spot for all things related to video editing and motion graphics. Today, we’ll go over an important part of Adobe After Effects: How to Add adjustment layer in after effects. This powerful tool can greatly improve your post-production process by letting you apply effects and corrections to multiple layers at once. So, let’s not waste any time and learn how to master the art of adjustment levels! Make sure also learn about How to make Precomp in After Effects.
Table of Contents
What is an Adjustment Layer?
In After Effects, an adjustment layer is a transparent layer that sits on top of your design and does not change it. An adjustment layer is different from regular layers because it is a control panel for adding effects and changes to multiple layers at once. It works like a virtual filter through which the content of other layers can pass. This makes it a useful and flexible tool for editing videos.
Step-by-Step Guide to Adding an Adjustment Layer:
Step 1: Create a New Composition
Before we add an adjustment layer, let’s start by making a new project arrangement. Click “Composition” in the After Effects menu and choose “New Composition.” Type in the choices you want for your composition, like resolution, frame rate, and length, then click “OK.”
Step 2: Import Footage
Let’s get started by importing the footage or assets that you want to use in this project. Simply navigate to the “File” menu, then to the “Import” menu, and pick the media files that you want to incorporate in your composition at that point. Simply beginning to work with these files requires you to drag and drop them into the timeline.
Step 3: Add Adjustment Layer
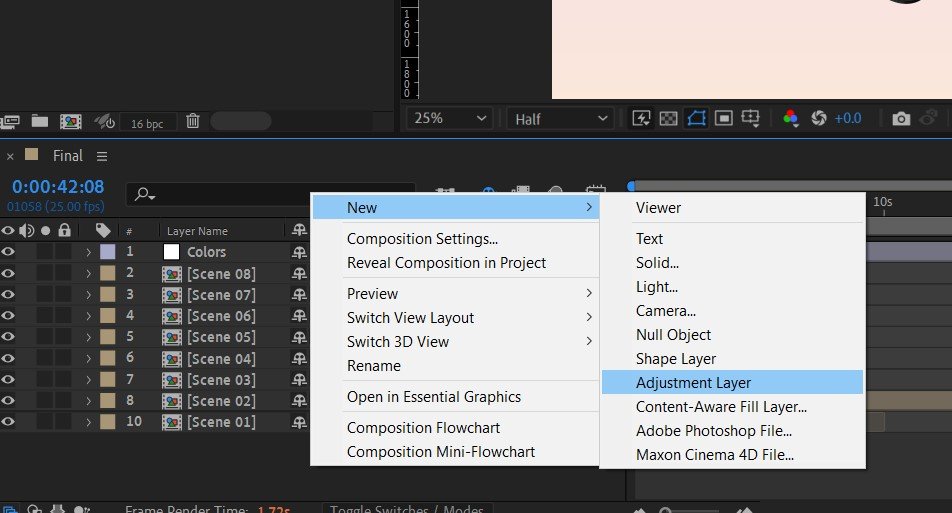
You can add an adjustment layer by going to the “Layer” menu and selecting “New” followed by “Adjustment Layer.” You also have the option to adjust the layer by right-clicking on the timeline panel, selecting “New,” and then selecting “Adjustment Layer.”
Step 4: Position the Adjustment Layer
The adjustment layer will show up in your timeline as a new solid layer when it has been added. It will have the same dimensions as your composition if you don’t change the default settings. Because the adjustment layer must be on the highest layer in order for it to have an effect on the layers below it, you will need to drag and drop it to the very top of the layer stack.
Step 5: Apply Effects and Adjustments
Now we get to the enjoyable part! Once you have the adjustment layer chosen, head over to the “Effect Controls” tab in After Effects so that you may investigate the plethora of effects and modifications that are at your disposal. Applying effects to the adjustment layer will cause those effects to be applied to all of the layers below it. These effects may include colour correction, filtering, or any other visual enhancement.
Example: Enhancing Color Grading with Adjustment Layers
Let’s imagine that we have a piece that consists of a variety of video clips, and that we want to apply a colour grading effect that is uniform across the board for all of them. If we want to create the same effect in the most time-efficient manner, we can utilise an adjustment layer rather than manually modifying each video layer in turn.
- Begin by importing your video clips into a new composition that you have just created.
- In the topmost position in the layer stack, add an adjustment layer.
- Make sure the adjustment layer is selected, and then head over to the “Effect Controls” panel.
- Use the colour grading effect that you want, such as “Tint,” “Curves,” or “Colour Balance.”
- Adjusting the settings of the effect will help you obtain the look you want.

In a few simple steps, your adjustment layer will apply the colour grading effect to any video clips below it, giving your production a professional and accurate look.
Conclusion:
Congratulations! You are now an expert at applying an adjustment layer in After Effects thanks to your hard work. Your proficiency in video editing will unquestionably improve thanks to the implementation of this vital approach, which will also help you save significant time during the post-production process. Try out a wide range of effects and modifications, and let your imagination run wild as you construct jaw-dropping visual experiences for your audience.
Keep an eye on this site, as we will be posting additional helpful instructions and hints in the near future. Keep on producing and coming up with new ideas until we meet again!
Best wishes as you edit! 🎥🐌
[…] creative freedom. Don’t forget to read our other blog posts about Snail Motion, like “How to Add Adjustment Layer in After Effects” and “How to Make Precomp in After Effects” which will help you build on what […]
[…] Explore the world of adjustment layers and learn how they can help you make your work easier by letting you apply effects widely and make creative changes quickly. Link to the Blog Post […]
[…] How to Add an Adjustment Layer in After Effects – With this important method, you can take your color grading and visual effects to the next level. See for yourself here. […]
[…] How to Add Adjustment Layers in After Effects: Discover the power of adjustment layers for faster editing and global effects. […]
[…] materials that mesh well with your ongoing discovery of the animation world. Find out how to use Adjustment Layers to give your work that extra polish it needs. Create Precomps to improve project planning and […]